Create a cPanel Firewall

MX Guarddog can automatically configure cPanel Firewall using our cPanel Sync service. Instructions below are for customers who wish to make the changes manually.
Some spammers realize that if they send email to mail.yourdomain.com they may be able to bypass spam protection, it is called a direct delivery attack.
Good news for those who use cPanel... Using cPanel's filtering rules you can create your own email 'firewall' to prevent spammers from delivering mail to your server.
Follow these instructions to create your own 'firewall' rule and stop spammers from delivering directly to your server!
Step #1 - Account Level Filtering
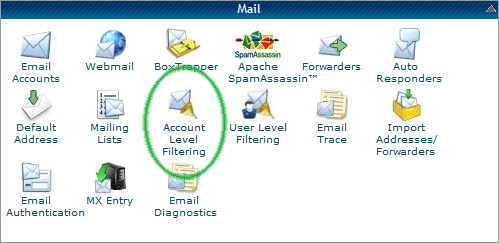
From your cPanel interface, under the mail section click Account Level Filtering

Step #2 - Select Create a New Filter

Step #3
Enter a Filter Name in the filer name box. Your domain name via MX Guarddog should work well, since the filter name must be unique for each domain name.

Step #4a - Single cPanel Domain
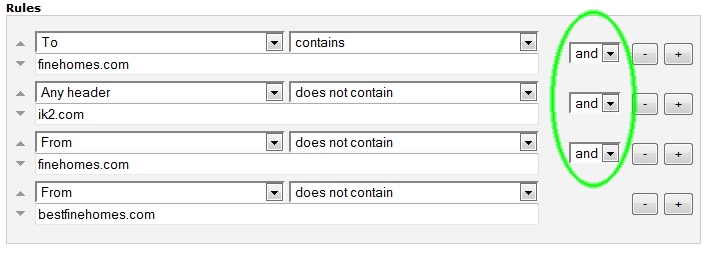
If you have only one domain under your cPanel account, you can setup a rule like the sample below. If you have multiple domains under your cPanel account - goto step #4b.
The To rule contains your domain name.
The Any header does not contain ik2.com (the network used by MX Guarddog).
The From rule does not contain your domain name (allows users within your domain to send email to each other).
The three rules must be joined with the AND condition, very important.

Step #4b - Multiple cPanel Domains
If you have multiple domains under your cPanel account, setup a rule like the sample below.
The To rule contains your domain name.
The Any header does not contain ik2.com (the network used by MX Guarddog).
The From rule does not contain your domain name (allows users within your domain to send email to each other).
Add an additional From rule for every domain you have on your cPanel server, to allows users on your cPanel account to send email other.
The three rules must be joined with the AND condition, very important.

Step #5 - Rule Action
In the Actions box select the action you want to take. We suggest you deliver mail to your junk folder to test the rule. Once you verify the rule is working correctly you can set the rule to Discard Message so they are deleted automatically

Step #6 - You're Done!
That's it, your new rule is active. Your new rule will filter any message that is delivered to your server that did not pass through MX Guarddog. You're now fully protected by MX Guarddog - say goodbye to spam!
*** NOTE *** You should add this rule to cPanel only if you have been using the MX Guarddog service for at least 48 hours. If you just switched to MX Guarddog your new MX records may not be fully propagated yet - so wait 48 hours before adding this rule.
